Been busy with several things make me lazy to write a new post, but my spirit has raising after I have finished my own mini studio for photography of Gundam and figures. Actually I wanted to build this long time ago, but there was no clue how to build it until I found the tutorial from zer0shift at kaskus. The tutorial taught me how to build mini studio with some inexpensive tool which are easy to find. This is the cheap version of light tent so all of you can build it easily.
You can see the pictures taken using the mini light tent, well please don't fuss about the dust on my MG Wing Gundam Zero Custom >_<. It just the sample object to show you the result of this mini studio. For those who want to build it, I would like to give you what tools needed and the process to build it.
- Cardboard that is large enough (at least almost 2x of figures and nearly 3x higher than the width of figures).
- White cardboard (size adjusted to the size of the cardboard) as a reflector.
- Background (can use cardboard, cloth, or other materials).
- White plastic (I used a white plastic bag).
- Cutting tools like scissors and cutter.
- Ruler.
- Paper Glue and "duct tape"
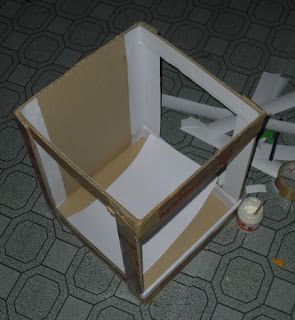
After you grab all the materials, you can start making this mini light tent from making a hole big enough on the top, left, right, and front boxes. And cover it with a piece of white cardboard on the inside. Just follow the instructions and the pictures below.
Put the background inside the box, the pictures below using a white cardboard but you can using any colors. If you want to reduce the reflection of light try using the cloth for the background.
Continue to cut the plastic and adjust it with the size of the hole. Then try to cover the hole at the top, left and right with the white plastic. At the front side is relatively, you can add with the remaining white cardboard as a reflector just like the pictures below.
The mini light tent for the figures and gundam photography is finished. Just plug the lamp for the light just like the photo taken from the pictures below. To regulate the shadow you can add lights on the side too. Well mine not yet completed enough because I'm still confused wether to use white or black cardboard for the background. And I need to buy more lights because I just did not statisfied with the result using just one light.
After all this activity makes me feel alive if it compared with my recent activity. I always love to make something like this because it will increase the creativity of mine. My lates project was only the SD Devil Gundam Phase Shift Mode. Maybe next time I want to give a little touch on my MG Wing Gundam Zero Custom.
This is the end of the tutorial how to build your own Mini Light Tent. Hope you enjoy the tutorial and please always visit and support Toys and Hobbies because it will share more hot review and awesome news related to it.


4 comments:
Thx for the tip bro! No wonder you pics are some nice!
@dennis
youre welcome sir,, I'm still learning to it :D
wow... wing zero custom.. favorit ane gan..
tapi sayang angel wing ini hanya muncul di Endless Waltz...
lalu hancur...
wah suka seri wing ya gan :D
iya nih,, padahal keren syg cuma di 3 episode endless waltz doang :D
Post a Comment